 with Brent may
Toyota Axle Swap
 OK, so youve been eye balling those big new set of tires, and the extra help they will give on those rocks and ruts youve been playing on. You also know that a 33 tire is just about the limit on the stock Suzuki axles we all love so much. You dont really want to sink a ton of money into aftermarket axles either, so you think you have found the perfect set up. Toyota Mini Truck axles! Theyre defiantly bigger and stronger than Samurai axles, smaller and lighter than a Dana Axle (some say just as strong as a Dana 44). Plus they can usually be picked up cheaper than a set of aftermarket axles. In stock form there strong enough for up to a 35 or 36 tire. And with a few modifications can handle an even bigger tire.
BUT, heres the thing. Youre like me in that youre broke! No, actually being broke would put you in a higher tax bracket. You have ZERO cash to do this build. SO, how do you pull off this swap? Patience and an eye for a deal will be your friend. Also, being able to sell off what you already have on your samurai will help a lot in funding. Heres how I pulled my Toyota axles swap off, and actually made some money in the process.
My Samurai was already set up well, but I was approaching the limits of my axles and had been thinking of moving up to a larger tire to help clear some of the bigger rocks I was finding myself on more and more. So, the decision was made. Now, to start looking for some deals. This also gave me the added benefit of having parts to sell to help fund the swap.
 Ok, so lets look at what were going to need for this swap and exactly how were going to do it on the cheep. First are axles of course. I got mine with a complete (minus motor) parts truck still attached! This worked out VERY well in that I was able to use quite a few parts off of the truck (more on that later). The truck I got was a 1983 SR5. These axles are a little smaller (as in narrow) than the IFS trucks rear axles, but they are a matched set of axles which means I wouldnt have to look for a front axle and widening kit. I was approaching this project from the wallet approach, so my 83 axles are just fine.
Next are brake lines. Fortunately the Samurai lines and Toyota lines are the same size of fittings (10mm), the down side it that for the front you will need a line that is Female/Female and the rear will need to be Male/Male.
Then there is your steering set up. Unfortunately, theres no bolt up and go here re-using your Samurai stuff, so either an aftermarket set up will be needed or you can fab one if you have the skills to do so (But ONLY if you have the skills to do it safely. This is steering were talking about).
You are probably going to need some drive shaft adapters as well if youre using the stock Samurai D-shafts. Here is another plus of buying a parts truck. The CV Front D-shaft out of the 83 Toyota is a perfect fit for the rear of the samurai and will also help out with the fact that the Toyota rear axle is a centered diff.
 Then, lastly will be wheels and tires. Toyotas are a 6 on 5.5 lug pattern while Samurais are a 5 on 5.5. Plus the bigger axles mean you can run a bigger tire. Yes, there are a few companies that make adapters, but were working on the cheep here. So it would be new wheels and tires.
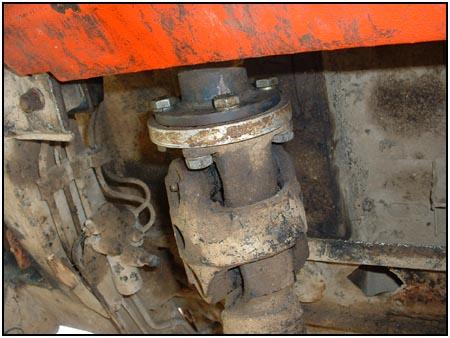
I had decided that I didnt really want to move my springs to mate up with the Toyota perches, and tweaking the springs to fit didnt sound very good either, so I decided to get new perches. Plus I wanted to get a little taller than normal perch to help clear the new tires I was getting. (after having done the swap, I think I went with too tall of a perch).
SO, we have our list of needed parts; now lets see what we have on hand already. I was already using a Toyota Front CV shaft in the rear, so I had Rat adapters on hand and wouldnt have to worry too much about the centered rear diff. I also had some longer S.S. brake lines given to me by a friend that was left over from a previous project of his. They were basically extensions and were Female/Female so they were perfect for the front! I was also able to salvage the rubber lines off of the parts truck, so I was good either way. Unfortunately, this was the end of what I had on hand. So, it was off to the net to find what I needed to finish the project. Another bonus of getting the parts truck was being able to get the power steering set up off of it. The 83 (and any solid Axle Toy for that matter) steering is a push pull set up, so I needed an IFS Box which was pretty easy to find, the rest of the power steering set up will work perfectly.
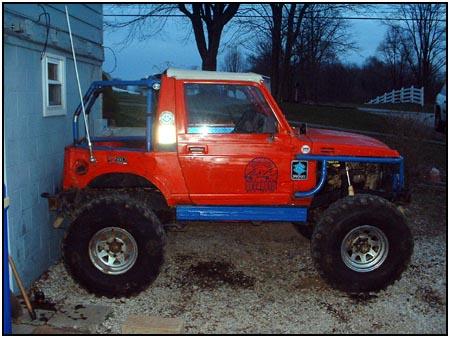
 I had a friend at a local fab shop make me a set of perches for the swap. I had these drilled 1 off center so that I could stretch my wheel base front and rear some. I also got new u-bolts as well. I decided to use a taller perch and needed longer u-bolts, plus I didnt really want to re-use my old ones although some people do. For tires I was currently running 33×13.5×15 Swamper LTBs and found someone that was willing to trade me a set of 36×12.5×15 Swampers TSLs on a set of 6-lug 15×8 steel wagon. So, looks like my new tires were set. I was also able to find a deal on a home built crossover steering set as well (my rig sees VERY little road time now, so I could run a home built steering, plus it’s very well put together). Its a pretty nice set up and was way cheaper than some others I had seen online. With a little tweaking I believe it will be a great set up. If I were building a daily driver, I would have gone with an aftermarket set up. Due mostly to safety factor.
So, Time for the swap. I wont spend a lot of time on this part because its just basically a SPOA install. The only main difference being the front passenger side spring perch needed to be clearance some to fit over the diff housing. This is partly why I decided to run a taller perch. It gave me plenty of room to make it fit properly. And keep everything level. So, with the axles under the rig, and the pinions set, it was time to weld the perches on. The rear axle has more than enough room to cut the stock perches off and weld new one’s on to match your springs. Some guys just move the front springs out to match the Toy perches, and others just bolt them down and go since there is less than 1/2″ difference.
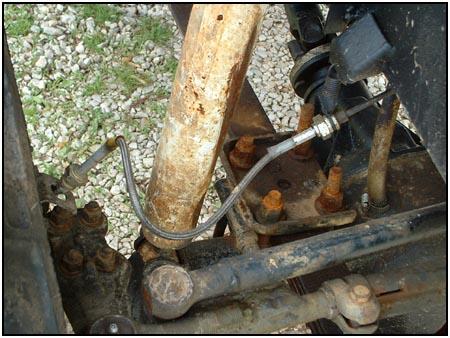 Brakes were next. The two S.S. lines were hooked up on the front. And a short hard line was used to connect the rear. I have a 88.5 Samurai, so I have the single rear brake line, so it matched the Toy lines perfect (looks made to fit). Like I had said before, I already had the front lines, and I just needed a short section of line found at your local Auto Parts store of your choice. My purchase was made and the brakes were hooked up, bled and ready to go. My donor truck had been sitting for quite a while, so new rear brakes are going to be needed. So, these are some things to think about when planning you swap. New bakes front and rear arent that expensive anyway.
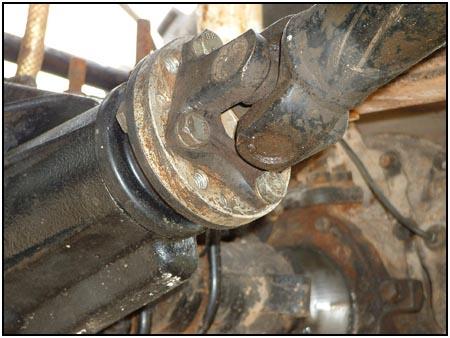
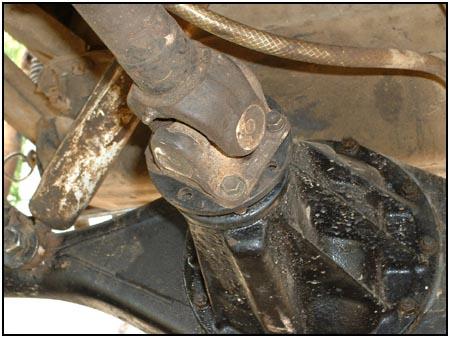
Drive shafts were next. The rear was basically a bolt up affair since I was using the front CV shaft out back with the Rat Adapted I already had. I used the other half of my set of Rat adapters to hook the front drive shaft up and was ready to roll. One Adapter on the Diff (front), one on the T-case (rear), and I’m ready to roll.
 The home built crossover I got uses Toyota arms, bent and re-enforced to make hi-steer arms. It also uses the stock Toyota tie rod and has been adapted to work with a Samurai steering box. I had to make a new steering arm since Im now using the Toyota IFS power steering box, but was still able to save quite a bit of cash over purchasing a new kit. I feel that my design I have is solid enough to be safe or I wouldn’t use it. DO NOT ATTEMPT THIS IF YOU DO NOT HAVE THE PROPER SKILLS TO MAKE IT SAFE.
 I also decided to re-gear my axles for better off-road performance. I lucked out and had found my set of donor axles with 4.56s already in them. While I could get by with these, I want more of a low end grunt for a better trail set up. I found a used set of Toyota 5.29 thirds on one of the forums I visit for a very good price. Buying complete thirds also saves me the trouble of having to set up a new ring and pinion plus buying install kits. Im also going to be running welded diffs front and rear as well. I know, bad idea, run a locker up front! This is a budget build remember, and right now a locker isnt in the budget!
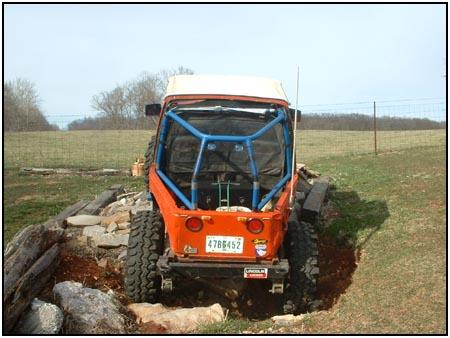 I was able to actually make a little money by selling off a lot of the parts truck and the parts off of my samurai I was no longer using. I had set a budget of $1,200 and I probably could have stayed under this had I not decided to go with power steering, but with the welded front and large tires, its almost a necessity if Im going to enjoy my trail time! You mileage may vary, but this is more of a guide to show that you don’t necessarily have to have loads of cash to run these axles. Just be patient, look for deals and be willing to put a little blood, sweat, and gears into your project and you too will be rolling on big fat tires in no time!
08/11/10 15:11:47