 With: Rae Champoux
The list of obstacles were long, three holidays, colds, mandatory overtime for Mitch at work, a surgery for my mother in-law thank goodness we have all made it into the New Year Thats right folks it was a long hard road to get here but the coils were finished this weekend. Put a fork in it, DONE! This was by far the hardest thing we have ever tackled in the garage. Taking the body off made the task so much easier by allowing us the ability to tackle things from above and below the frame. When we made the choice to make the tin top into a project truck we started to compile a list of things we wanted to do, and as the list grew, we figured that removing the body would help, not to mention make taking photos a lot easier. It has paid off, big time I think. But as the days tick by and the list of things seems to grow instead of shrink, we are just hopin we can pull this off.
 Some more of my goodies for this project truck found their way to me during the holidays. The front bumper is from Shrockworks. This bumper is so nice, I am anxious to see it painted and installed, but that will have to wait until the body goes back on.
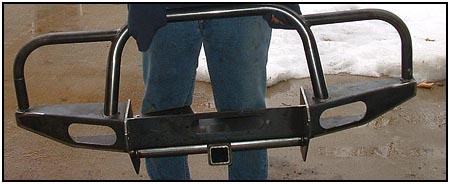
 The rear bumper is from Zuks Offroad is a work of beauty!! It was packaged so nicely, it took me a long time to get it out of the box to see what it looked like. Once I got it out of the box, I was amazed at the craftsmanship on it. Man it is going to look sharp on my tin top. I had Myron at ZOR send the rear bumper to me in the raw state, since I will be using the bumper as a location to have my exo-cage attached to, it didnt make sense to have it powder-coated. Myron was happy to accommodate that request. The rear bumper was so heavy, in the photo I am about to give up on holding it. I really am impressed with the quality of it.
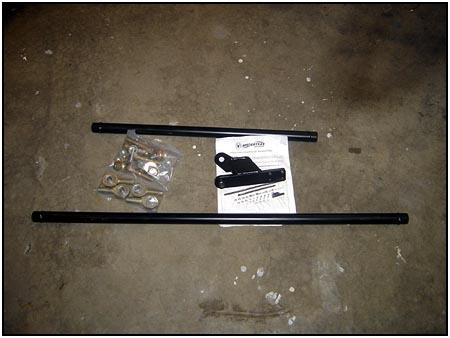

 I finished up the front end with Jim, my father in-law, and family shade tree on Saturday this weekend, while Mitch welded up some things on the rear end. I took apart the front passengers brakes to get to the kingpin and attach the bracket for installing the Spidertrax crossover steering, for some silly reason I always seem to tackle this stuff with hand tools, although, I am not sure that I would have been able to have gotten the air gun in there anyhow. So, I got the bolts out of that and attached the bracket with longer bolts, all provided in the kit from Spidertrax. The kit goes on so slick, it was the perfect part of the project for me to do, since I am not a wiz in the garage.
  What this kit does is it runs the drag link above the springs to eliminate bumpsteer. It attaches on the passengers side with a highsteer arm on the passengers side and the tie rod mount that is already there. That puts the steering force in its original designed location.
 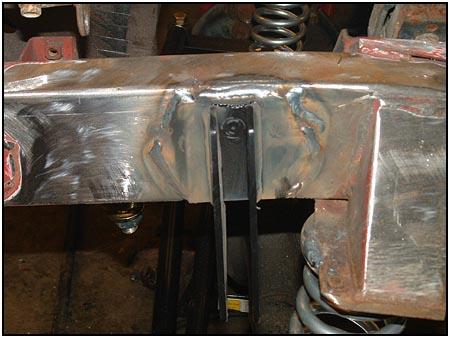 Now, that is a paraphrase from the Spidertrax website I was lost on how to explain that. J
On the drivers side of the truck, there needed to be a bracket welded to the frame rail in front of where upper spring perch was. That needed to be put in place so that the link has a mount on the drivers side. I mention to my father in-law that I would love to learn how to weld, so that I can help out more in the garage.


With that being said, he was laying out a few scrap pieces of angle iron and there started my lesson on how to weld. I am wearing one of the two welding hoods in the garage, while Jim has on the other, I am wearing Mitchs welding gloves that are seriously three sizes too big for me, but I am petrified to not have anything on my hands. 
 After a few words on speed and distance to keep the wire from what I am trying to weld, I am off, and all I can hear is popping and snapping, and Jim telling me I am too far away from what I am welding. I stop, flip up the welding hood and take a look, there are little splats of welding stuff all over the angle iron. I keep holding my breath, thinking that will calm my shaking hands, but it doesnt. Plus I am all weirded out because I just had safety training at work that talked about argon gas and how it can work as an asphyxiate , it displaces oxygen and can cause headaches, drowsiness, vomiting, unconsciousness and death. So those thoughts being fresh in my mind had me a bit freaked out. I take a big big breath and start again on the angle iron, and that line turned out good, it looked decent and penetrated really well. So, Jim and Mitch ask if I think I would like to weld this bracket onto to frame rail, I am all about welding at that point so I say yes! We work on getting the bracket lined up so it wont interfere with the coil and I used a C-clamp to hold it in place, Mitch tacked in a few spots for me and then it was my turn. I have to say that it isnt the cleanest welds I have ever seen, but considering that I had only welded for a few minutes before working on that bracket I think that it looks great!
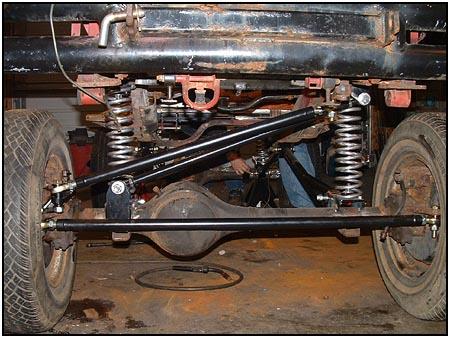
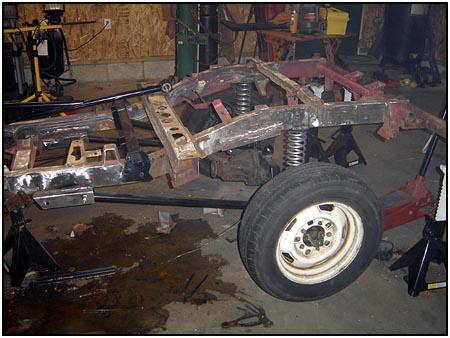 So with that bracket in place we were able to put the stock ugly tires on the axles and get the frame off of the jack stands. Now we have to order a body mount kit and figure out what we are going to do about the engine that needs to be rebuilt that we have. Not to mention painting the frame, painting the body, getting the truck over to Wisconsin for 4X Fabrication to work out the exo-cage and some other goodies. Its February already and I feel like we are going to run out of time! Cross your fingers for me, and stay tuned for next month.
The Diva’s Down and Dirty:
(800)286-0898
Cross Over Steering Kit
Detroit Quickloc Rear Locker
OEM Front Axle Repair Kit
]]>
(877) 474-7625 Front Bumper Gas Tank Skid Plate
(800)952-8915
Interior Panel Kit. ]]>
Myron at US LEGACY (928)567-3061 Monday through Friday 10:00 am to 6:00 pm (MST)
Rear Bumper
Starter Fix Kit Doorless Straps Kit
(847) 544-1823
High Clearance Cross Member
Transfer Case Bucket
Exo-Cage]]>
07/24/2010 08:19

Rocky Road Outfitters:
(888)801-7271
Coil Suspension Kit ]]> Zuks Off RoadShrockWorks