 with Rick Alexandra (Andy) Cooper
 We just bought a ’94 Samurai JL and are busily modifying it. One of our first projects was the half doors purchased from Kayline. I’ll relate our experiences to aid others who attempt this modification. I have a pretty good mechanical aptitude but little experience working on cars so if I seem pretty lame or the article is too elementary, that’s tough- at least it proves nearly anyone can have fun fixing up a zooki. Also, Murphy’s Law always applies to my projects which will make this article a little more informative for other similarly afflicted readers.
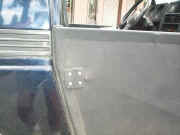
1. We received the kit and found all the parts present. It became obvious we would need an impact screwdriver to remove the door hinge screws so we picked one up at the hardware store. The first task was to remove the four screws that hold each hinge on.
2. Pounding on the impact driver (make sure it’s set to twist the correct way when you hit it) eventually loosened all the screws but two (of course). The Philips recesses in these two screws were totally ruined by the impact driver.
3. Another trip to the hardware store produced a screw extracting bit and a corresponding drill bit of the size recommended on the extraction bit package. first, I used the drill bit to create a hole about 3/16″ deep in the center of the first stuck screw. Make sure the bit goes in as straight as possible in the dead center of the screw head.
4. After placing the screw extractor in the hole and I began to turn it counterclockwise with a small crescent wrench. Wow, the bolt loosened and came out.
5. Feeling’ great now I started the procedure on the next screw. Everything was great until the screw extractor snapped in half when I tried to turn it. I soon found out that you can forget about redrilling the hole for another extractor with the broken one still in the hole. In a panic I stood back and wondered how I was going to get that last screw out- that last screw that was holding up the whole project.
 6. AH HA! I unlatched the door with one hand and supported it with the other. Since it was only held in place by one screw, I was able to swivel the door down and this loosened the screw. Re-latching the door I then clamped a small vise grip to the edges of the head and unscrewed it. Whew.
7. After purchasing new hinge bolts at the hardware store (our Ace had the correct metric threads) we installed the new hinges and the half doors.
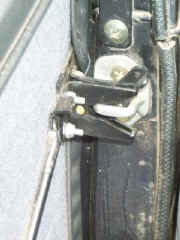
8. The diagram explaining the installation of the door latches was too faded too see but from the written instructions I think I installed them correctly. The latch consists of a bent strap of metal that rotates up and down hooking the striker on the samurai body- but not very well. We also found that over bumps, the latches flopped open and the doors would open on their own- and with our stock suspension, the doors were flying open all the time.
9. Once again, I took a long look at the problem and was inspired. The striker is just a u-shaped rod and… how about a garden gate latch? Another trip to the hardware store produced two standard gate latches.
10. The gate latch attaches with four holes. I carefully lined up the door, latch and striker and marked the door where the latch holes were. Luckily one of the holes falls on the hole in the door where the provided door latch passes through. I fabricated a backing plate to go on the outside of the door (I used expanded pvc for its flexibility and weather resistance. It’s available from your local sign shop as scrap). Next using the existing hole, I bolted on the latch, checked the latching action and marked more accurate locations for the other three holes. For these I had to carefully cut holes through the door fabric. I placed glue on the torn fabric to reduce any fraying. I then installed the other three bolts along with the backing plate.
11. The latches work great. There is no outside latch but you just reach over the half door and flip the release. They hold securely and there is even a little tension so the door doesn’t rattle. It’s too bad the kit doesn’t come with the latches rather than the big bag of useless hardware they did provide but I guess the manufacturer would feel pretty silly throwing in “garden gate” latches.
Sierra Sign & Award 775-831-9439www.ssanda@nvbell.net
08/11/10 15:07