 with Joe Sandifer
Installing Tracker / Kick rear seat belts in your Sami
Materials needed: Roll / Sport cage with rear family hoop Geo Tracker / Suzuki Sidekick (2 door) rear seat belts and buckles with original hardware Some minor fabricating skills and welder or a good sheet metal shop (I used the latter) (2) x 4 Grade 8 bolts and nylock nuts (2) 9/16 x 1 Grade 8 bolts and nylock nuts (or metric equivalent) (2) 3/8 x 2 Grade 8 bolts and nylock nuts (10) 1/2 washers (4) 3/8 washers 3/8 drive ratchet socket and box wrench 9/16 socket and box wrench 14mm socket Saws-all, or other metal cutting device Grinder Loc-tite (or other thread locking compound)
If you are like me, you look forward to driving your Samurai every day. And if your kids are like my kids, they love to ride in the Samurai as much as you do. But, if you are like me, you have often been troubled with the fact that the miniature rear seat passengers dont have the added safety of shoulder restraints on their seat belts. This concerned me to the point that I had to try to do something about it. I had already taken the first step in adding to rear seat safety by adding a Petroworks sport cage in my truck (and while they say it is not intended for protection in the event of a roll over, I cant help but believe it will hold up better than just having the soft top spreader bar back there!) So now, what could I do? Being relatively new to the mini 4×4 scene (my last two 4x4s were full size Broncos), I didnt know exactly where to begin, until a friend of mine came over to the house one day in his Tracker. I got to looking, and inspiration struck! I had to find a way to fit these seat belts into my truck! So after a few trips to the salvage yard and a friends sheet metal shop, I had a game plan! This is what I came up with. It costs just over 100 dollars to have this done, and if you have fabrication skills, you can do it for way less! I purchased a set of rear seat belts and buckles out of a 2 door Tracker, and took the seat belts and the Samurai down to the sheet metal shop and dropped them off. What he did was as followed: 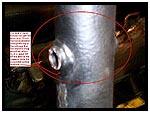 – He drilled a hole into the sport cage approximately 30 off the floor, then installed a piece of thick walled tubing with a inside diameter through the hole and welded it up.
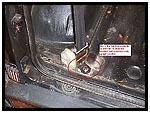 – He then took the bottom tab that mounted the Tracker seat belt reel to the side of the Tracker and bent it 90 degrees to allow the Tracker reel to be mounted on the Samurais floor in the factory seat belt reel location while still maintaining the Tracker reels upright position. (Necessary to prevent the reel from locking.)
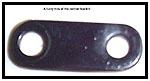
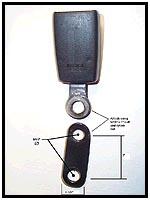 – The Tracker seat belt buckle is attached to a relatively short mounting bracket. A lengthened bracket is required to move the Tracker buckle forward on the Samurais seat to allow the buckle to be accessible to back seat passengers. This bracket should made from 3/16 thick metal and measure about 1 1/4 wide with two 9/16 diameter holes spaced 3 apart. My sheet metal shop provided this for me as well. After that it was back to my home shop, where I followed the next few steps to finish the install: NOTE: The use of Loc-tite or other thread locking compounds is recommended on all bolt threads.
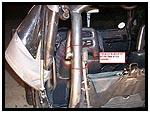
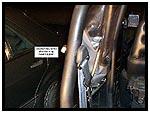 – I removed the factory seat belt reels and buckles from the Samurai, and laid them aside. – I removed the back inside bolt from the fender well mount on my Petroworks interior sport cage. – I then took my Tracker seat belt shoulder mount and x 4 Grade 8 bolt and loosely attached it to the custom mounts on the sport cage. – I then placed the Tracker seat belt reel in the factory Samurai seat belt reels position and, using the factory Samurai bolt, loosely attached it to the floor. – I then attached the stationary end of the Tracker seat belt to the rear inside fender well mount of my Petroworks sport cage using (1) 3/8 x 2 Grade 8 bolts with (1) 3/8 washer and (1) washer on top of the seat belt mount and (4) 1/2 washers under the mount (to prevent the strap from getting pinched between the seat belt mount and the sport cage mount).
 On the tire side of the fender well, use (1) 3/8 washer and (1) 3/8 nylock nut to secure the bolt and the seat belt mount to the truck. – Test the seat belt to make sure it operates properly. If not, make any needed adjustments. – If so, then tighten the seatbelt reel to the floor, and tighten the stationary seat belt mount to the sport cage. Finally, tighten the bolt holding the shoulder mount down snuggly, then loosen the nut 1/4 turn (just enough to allow the mount to swivel on the bolt). Use a saws all to trim any excess length off the bolt to prevent a hole from being rubbed in your soft top, then grind smooth. Now, we are ready to attach the buckle. – Using the 9/16 x 1 bolt and nylock nut, attach the Tracker seat belt buckle to the extended bracket you had made from the sheet metal shop.
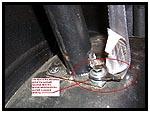
– Now attach the other end of the custom bracket to the Samurais seat in the factory Samurai seat belt buckle location. NOTE: The Samurais factory seat belt buckle bracket is made of the same nylon webbing that the seat belt is made from, allowing the buckle to move freely. This freedom of movement is necessary to allow the seat back release to properly operate allowing the seat to be folded forward. This is where the factory Tracker hardware will come in. There is a bolt that comes from the Tracker (I feel certain that it is the same one that held the buckle in place on the Tracker seat. Trial and error will prove this for sure) that is the same thread pattern as the bolt that holds the Samurai seat belt buckle in place.
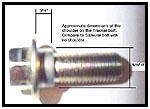 This Tracker bolt, however, has a 9/16 diameter x 3/16 length shoulder on it. The Samurai bolt does not. Take the shoulder bolt and insert it through the custom bracket into the factory seat belt buckle mounting hole and tighten. It should bottom out and still allow the seat belt buckle bracket to swivel, allowing full use of the seat back latch to fold the back seat forward, when needed.
– Repeat these steps for the other side.
This completes the Tracker rear seat belt install in your Samurai. Check for proper operation of all components before putting them on the road.
Joe Sandifer runs a spray in bedliner business in Clinton MS that targets the 4×4 interiors market such as Jeeps and Samurais. You can find him at www.clintonsuperliner.com
Note: This install has NOT been safety tested or certified and is only an overview of a modification I performed on my personal vehicle. As stated in this article and on Petroworks website, their sport cage is not intended as a safety device and is only for aesthetic enhancements. How you use this information is up to you and is not warranted or endorsed or insured in ANY way by myself or by Petroworks. I have no affiliation with Petroworks. I only use a sport cage that I bought from them for this install. Petroworks has full right to their name and product. Any duplication of anything owned by them falls under what ever copyright laws they see fit to enforce. If you use this information, you do so at your own risk, and should check local safety standards in your area regarding modifications of seat belts in motor vehicles. The names Tracker, Sidekick and Samurai are all property of their manufacturers and are used here only for reference purposes.
Joe Sandifer runs a spray in bedliner business in Clinton, MS that serves the 4×4 interiors market such as Jeeps and Samurais. You can find him at www.clintonsuperliner.com
Happy wheeling!
08/11/10 15:03:23