 with Jbird
The Problem
 Ive owned my 1988.5 Samurai for 6 years. The very first modification I made was installing 235/75 tires. After a few years and a few inches of lift, I added 31×10.50 tires. Even though I had stock gears and a stock engine I was still able to use 5th gear most of the time. The Samurai was able to take me every where I needed to go off-road and on even with just these few modifications. Then about a year after I added the 31 tires I noticed that the engine didnt have as much power as it used to. I determined that most of my problem was my carburetor. The secondary wasnt opening up unless I ran the engine up to 4500 RPM. Any time the engine was at a steady speed I could feel the engine surging and sputtering. I knew it was time to do something about the carburetor, but what?
I had several factors to consider before deciding on a course of action for the misbehaving carburetor. Like most people, money was the biggest issue. I had to have something reliable because the Zook is my daily driver. Performance and off-road ability had to be considered too. I knew that rebuilding the stock carburetor was not a valid option due to high cost and the historic problem of questionable reliability. The Weber carburetor swap seems to be a popular upgrade but I have heard and read many stories about problems when off-road and with tuning them. Then I heard about a Pony carb; I was thinking, what the heck is a Pony carb?
The Solution
Well, a little web surfing led me to Alex. He has a great web sight with a lot of information about the Pony carburetor. The carb is from a Hyundai Pony that was only imported to Canada. Alex is kind enough to rummage through scrap yards to hunt these carbs down and send them to Zooksters here in the States. I decided to take a chance on this Pony carb. There might be other people who can get this carburetor other than Alex, but I had heard he was a reliable person who I could trust. As I said before, Alexs web sight is very good. He has detailed instructions and a list of parts you need to do the swap. He is always updating the instructions as more and more people take advantage of this swap. I will explain how I did the swap on my 88.5 and the problems that caused some grief.
Preparing for the Swap
Heres a list of parts I ended up needing and what I paid for them:
4- 8mm x 62mm (1.25 thread) carb mounting studs  $6.00 1- 8mm x 45mm (1.25 thread) bolt $1.10 Manual choke cable $6.00 Can of carburetor cleaner $3.00 Permatex (Form-a-gasket) $0.00 (I had a tube) Misc. vacuum hose (small & large) $1.00 (re-used pieces Misc. screws to plug vacuum hoses $0.00 (had some)
1- 3inch angle bracket $0.00 (had one) 1- inch plug (to block off spare gas port) $0.25 1- Canadian Hyundai Pony Carburetor $55.00
Total: $72.35
Tools I used:
- Dremel Tool w/ cut off wheel & grinding wheel
- Bench grinder
- 10mm & 12mm sockets and box wrenches (2- 12mm box wrenches)
- Basic Hand tools (screw drivers, pliers, hammer, etc.)
The Prep
 I received the Pony carb from Alex on Tuesday, so Wednesday afternoon I spent about 2 hours preparing it for the transplant. I thoroughly cleaned the Pony inside and out with carb cleaner. I was tempted to pull the carb apart to clean it better, but decided I didnt want to take the chance of ruining a gasket in the process. So I did the best I could to clean it up. I inspected all the linkage and butterfly valves to make sure everything was in working order. I replaced the 2 existing vacuum hoses with new pieces. I adjusted the secondary butterfly valve so that it was just barely open because you cant make this adjustment after the carb is mounted. I also backed out the idle screw and the screw that adjusts how fast the carb returns to idle. I used a Dremel tool to remove the small piece of metal that is attached to the main butterfly shaft on the opposite side of the linkage. This metal piece hangs down below the carb and will interfere. I used a inch plug with some Permatex on it to block off one of the 2 fuel ports. There was a large port at the bottom of the carb that might have been a coolant line or something. I blocked it off with a piece of hose and a bolt. I also blocked one of the 2 small vacuum ports at the base of the carb. The carb was now ready to install.
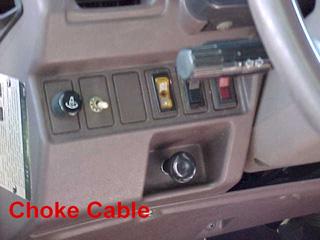 Thursday it took about 30 minutes to install the choke cable. My Samurai has an indent in the dashboard to the left of the steering wheel below the dash light dimmer control that appeared to be perfect for my manual choke. I drilled a hole through the dash the same size as the choke cable. I removed the nut and washer and fished the end of the cable through the hole while threading it through the nut and washer behind the dash and tightened it down. There was a rubber plug in the firewall right next to the brake booster so I poked a hole in it and ran the cable through and coiled it up in the engine compartment. The swap is continued on the second page.
08/11/10 15:18