 with Ron Sutcliffe
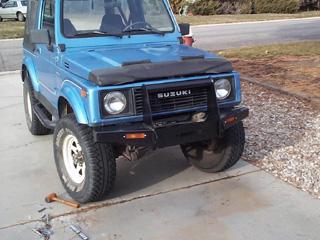
Calmini Winch Bumper Installation
The Calmini instructions were generic, they seemed to be written to fit other bumpers as well. The instructions for the winch bumper appear to be the same as the tube bumper. The ARB style winch bumper looks far cooler than the tube bumper.
Here are the tools you will need for this job:
Plastic mallet (to hit wrenches and free stubborn bolts) Phillips head screwdriver Medium wrenches or sockets – 10mm, 12mm, 13mm, 14mm (2) small vise grips hacksaw
WARNING! If you haven’t figured this out already, the Calmini bumper is stout. It weighs a ton, so don’t hurt your back like I did.
 1. The instructions tell you to unplug turn indicators and remove the bumper. I don’t recommend removing the turn signal indicators completely. Unplug them and using a 10mm wrench undo the ground connection. Next unbend the clever little soft metal wire holders and pull the plug all the way down to the frame. Don’t take out the little rubber plug and completely remove the wiring, it’s almost impossible to get those little plugs back in. Just give yourself lots of slack.
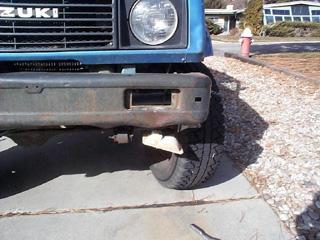 Next remove the turn signals from the bumper using the Phillips screwdriver. They will slide out from front to back with a little twisting. Leave the turn signals hanging down but be careful not to break the bulbs like I did because then you have to remove and reinstall a turn signal while the winch bumper is on. NOT a fun thing. Remove the bumper. It’s held on by 2 pathetic 12 mm bolts. These are bolted into a welded nut so you don’t have to hold the nut on the back.
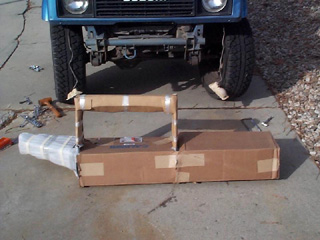
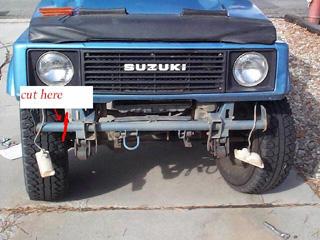 2. You have the option of cutting off the tube that held the original bumper. This would allow for more tire clearance, so I cut mine off. The good news is that a hacksaw fits just fine. It took me about 4 minutes to remove the first side and 8 for the second. Being tired and in need of a beer, I went in and got it. A Sawzall would be preferable. Leave about an inch sticking out so you can cap the ends with some PVC pipe cap. Just glue it in place. A 1.5″ cap will fit.
3. They don’t tell you this, but next you should remove the 4 bolts holding on the tow hooks. I tossed the tow hooks and bolts. Do this BEFORE you get the bumper in place. You can see by lining up the bumper where the 4 bolts will go.
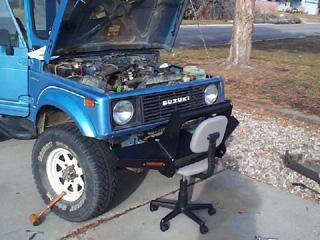
4. Rather than hurt my back again like I did when I picked up the bumper at the store, I obtained an office chair with adjustable height and had someone help me set the bumper on it. I then pushed the bumper into place.
 Next install the turn signals into the bumper. They install from the back not the front, unlike the OEM. I used a small Vise Grip to hold the nut and manually turned the Phillips screwdriver. When I later had to uninstall the lamps I used a power driver. Doh!
 5. Next push the chair (or whatever) into place and install the two bottom bolts to the frame. This allows you to cantilever up the bumper and now it won’t fall on you either. The winch plate needs to go UNDER the plastic drip pan or whatever it is that is under the radiator. Next I pushed the bumper up to make it flat and approximately in the right position. Don’t tighten anything just yet. Install the 2 U bolts into the winch plate. I got them loosely in place then put in the two top bolts that go into the frame. Then you can tighten everything down. Pull the wiring back up into the engine compartment and secure it. Reconnect the turn signal plugs and screw back down the ground wires.
 That’s it! 2 hour job (maybe). I didn’t keep track of the time.
08/11/10 15:06