 with Bob Norman
Part 5… Everything old is …. still old.
So, here we go again! Last May I all but abandoned the work on the Killer Bee, using the poor excuses of buying an old house and doing repairs, changing jobs, etc. (Read more in this month’s “Welcome Back to Me” editorial) and because of that didn’t make it to ZookiMelt with the Bee, opting to take the trusty (and rusty) blue hardtop “LockJaw” instead.
Well, I guess the vacation’s over. As much work as it is building a truck from the ground up, it’s sure a lot more relaxing than pushing to get a roof over your head before the snow flies. Ahh yes, though it is all work, some work is just much more enjoyable than other work.
But the “enjoyable” work doesn’t finish itself. It’s patient. It’ll wait, so there is no such thing as the saying “Everything old is new again” in this instance.
Enter into the garage. It’s been a long time old friend.
So, theoretically speaking, we’ll pick up right where we left off. The fenders are still cut. The truck is still green (some call it “Teal”. Green is green. Yuck). The body is still anorexic thin on sheet metal.
Most excellent.
So, sounds like we need to start adding metal, a cage for example. Since there is so little metal left in the stock locations, a ready built cage is out of the question (although very tempting) Follow along as I try to make the best of what I’ve got, and protect myself and passengers along the way.
No high tech, zillion pound power bender. This is an old school, Northern Hydraulics bender. Perfect. Not the prettiest or easiest creature in the world to master, but it does the trick.

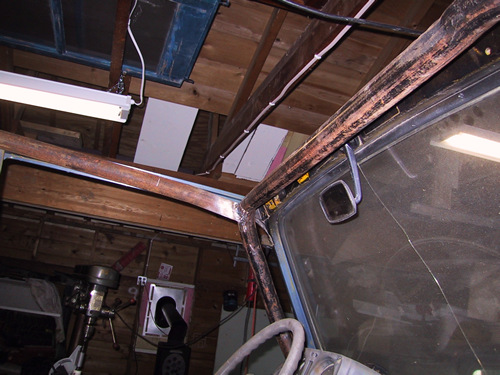
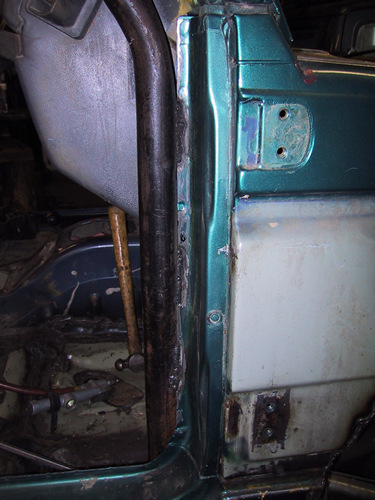
I hand bent the front bar last summer before moving. I’ll never do that again. 14 individual bends in this piece, believe it or not. I wanted the lower section of the front bar to run exactly along the front door opening seam….. .. so the cage could be welded to the firewall seam. I envision this adding more support in a roll than just anchoring the bottom of the pipe to the floor on a pad. Note the patch on the body under the windshield support. A little rust went rampant here during the hiatus. 
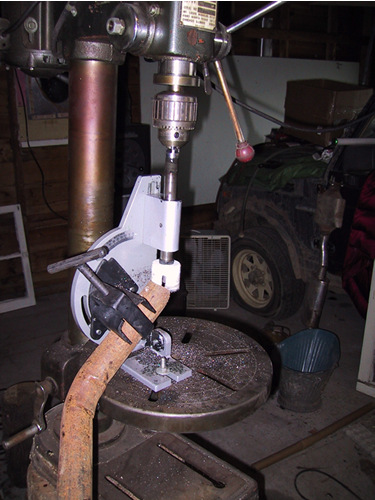
 I repeated the exercise for the passenger side also. You can see the “new” front floor in this pic also, and notice there is none of the heavy undercoating on the floor. If you’re going to do any welding on the floor, or any other areas with that stuff, be sure to scrape it quite a distance from the work area. It lets off awful smoke and harmful fumes if it burns. Life’s too short, scrape it back. I purchased an inexpensive tubing notcher to “fish mouth” the tubes to fit together better. Pop it into your drill press, oil the bushings, and notch away. It’s not the sturdiest thing made, but for under $80US you can’t complain.
I wanted to maintain the stock roll bar behind the targa bar, but wanted to add strength. The bolts got removed and the bar and base of the targa got welded.


Also, the upper tabs that connect the roll bar to the targa bar got welded in. I like the smooth look better than having the bolts stick out. I’ve cut myself on these bolt heads in the past, so I was glad to get rid of them.

From the rock induced destruction that happened on the old hard-top Bee, I decided that some sort of help was needed on the rear part of the body. These rails aren’t going to help a lot, but they also provide a place to strap trail goodies to. As you see, the cage doesn’t interfere too much with driver or passenger entry paths, but that wood seat leaves a little to be desired.

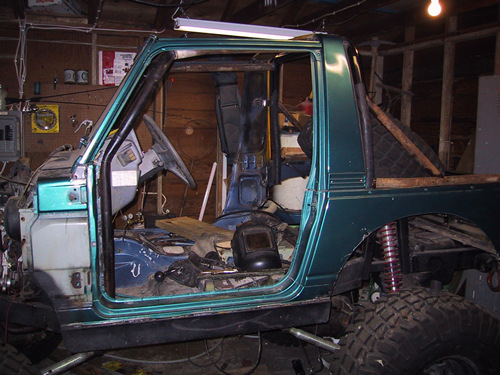
This is what the basic configuration of the cage looks like. The final pieces to be added and aren’t pictured will tie the bottom of the stock bar and the rear part of the bed protectors into the frame, and there are two more pieces that attach the top of the stock bar all the way to the frame. These will be left off until after the body is painted, then welded in permanently. These will be triangulated to provided maximum protection to the driver and passenger. Remember when working on a cage… triangles are stronger than squares. So what’s’ next? It’s time to pull the body back off and prep for paint, then spray it. So much work, spray cans sound mighty tempting. Time will tell….
I am still looking for somebody to fabricate me a fiberglass hood or scoop on the hood. The front suspension barely fit under the hood with the body lift, so now I need at least 3″ more. Any ideas? Mail technospam@izook.com for suggestions. Remove the “nospam” before sending.
08/11/10 14:50