 with Brandi the Rookette
Hello again. Im here for my second attempt at entertaining you with my wit and charm.
For those of you who missed Zookimelt this year, or did not read my first article (blasphemy,) heres a brief recap: I helped Murph (aka the Seasoned Rookie) rebuild his Samurai this past summer. We finished it just in time for Zookimelt where I was invited to be a part of the IZook family.
Well, for Christmas Murph blessed me with something I never would have imagined in a million years. Allow me to paint you a picture: He met me at the front door of his house. I walked in to the living room to find a Christmas tree cut out of a large cardboard box — He had strung lights on it and everything! You see, I had been whining about not having a tree ever since Thanksgiving, but we were working on remodeling the living room so there was no place to put it. Under the tree were three boxes. I was instructed that I had to open them in that specific order. The first box contained a small plastic New Jersey license plate with my name on it that he stealthily bought for me while we were down the Shore this past summer. Then I got to the second box. This one simply contained a ball of yarn and a small piece of paper that said follow me. I quickly realized that the yarn was actually coming from the dining room. I followed the yarn through the living room and into the dining room where I saw that he had strung this yarn in a very complex pattern across the entire house. I went through the dining room, the computer room, the bedroom, the bathroom, the kitchen, the workshop in the basement, back up the stairs and outside in to the backyard where it went around the tree and the fence and finally to the garage door handle. Now I have to admit he had been very weird about the garage for the past couple of months (I found out later mid-November) and I had a suspicion that there was some sort of elfing going on in there. But I never would have believed what I found on the other side of that door. He bought me my very own Samurai!!! I was so stunned that I couldnt speak for quite a while except to say, are you kidding me? A few tears were shed of course (I am a girl you know, cut me a little slack,) along with lots of hugs, kisses, and a thousand thank yous.
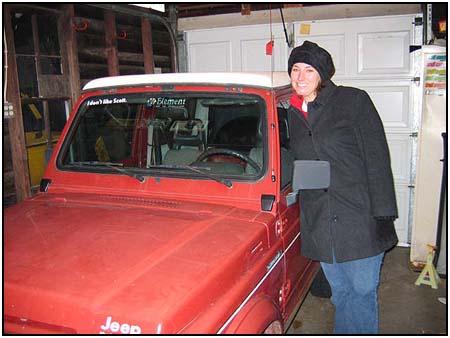 So The BrandiZook. My truck is great, but after driving Murph’s around for a few months I have a feeling that a little stocker just isn’t going to cut it for long. The wheels in my head started turning almost immediately as I started formulating big plans for my little Zuki. I am a rookie when it comes to this Zuki stuff in the truest sense of the word. I may have helped build a truck from the frame up, but the more I learn, the more I realize that I have a long way to go! I will be depending on all of you for ideas and suggestions in the next few months as I attempt to turn this truck in to something that is truly mine.
As of this very minute the truck runs….a little loud as it does not have a muffler, so that will probably be first priority. Murph says that I really dont have to have it fixed, but Ill have to do a lot of trails alone if I dont. Ive also been told that I am in desperate need of a new or rebuilt engine. The one in there now is leaking oil like a sieve. I also intend to remove the carpet and line the inside of the truck with the bedliner kit that Figmo sells at www.roadlessgear.com. Murph used that stuff and he loved it. The outside will be painted of course. My seat covers are on their way (a gift from my best friend Karyn) because it is important that I look good while driving this thing right? My hope is to have all of these things completed in time for the 2005 Melt.
I have been instructed to keep my truck stock for at least one full season before making any major modifications. Murph thinks it would be best for me to learn from the ground up the way that he did, which is probably a good plan. The theory here is that Ill learn to conquer obstacles and hills based on my own growing skills and judgment instead of big ol tires and gears doing the job for me. Once I learn the basics, then Ill be ready to get some springs and tires for more clearance so I can do MORE with what I have learned! Of course I would like to have it magically built up just how I want it, but realistically there is no way that there will be time for much more than what is already planned.
Stay tunedI hope in the next few months to offer some tech articles along with a little of my own narration of course, all from the perspective of the newest rookie on the blocknot quite seasoned yet. But definitely coming back for more.
We will consider this article episode 1 in what will probably be a very long series of “Brandi’s Zuki Creation”. Keep in mind at all times that you are reading something written by someone who is truly just in the infant stages of this addicting hobby/sport/ lifestyle/culture. I figure if I am just getting in to it there have got to be others out there who are just beginning as well. If you are not one of those people, remember me when you meet someone who is maybe these articles will be just their speed.
I had the opportunity to learn to patch a tire since my front driver side had a slow leak which was making steering the little beast quite an adventure.
Lesson 1-Patching a tire

Step 1- removing the tire
–loosen the lugnuts just a little bit
–jack the truck up so that the tire is no longer touching the pavement
–remove the lugnuts placing them in a safe place so that they will not get lost
–remove the tire


Step 2- locate the leak
–mix up a solution of dish soap and water
–using a paintbrush carefully brush the water on to the surface of the tire
–watch for any spot where bubbles start to magically appear
–this is the location of your leak!!

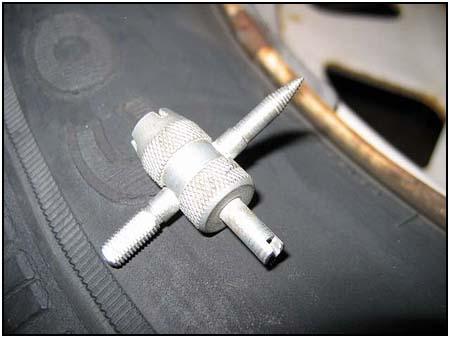 Step 3- Remove the little valve stem using the little bitty tool thingy carefully remove the pin thing so as not to allow it to fly across the room


Step 4- patch the hole
–Use the rounded file to enlarge the hole to make room for the patch
–Load the patch onto the large needle-shaped tool at the mid-point of the patch.
–slowly and carefully push the tool inside the hole until there is about a half inch of black stickiness remaining outside the hole
–quickly and carefully pull the tool out of the tire, leaving the patch behind to plug the hole


Step 5- make sure your patch is good
–reapply the soapy water solution as described in step 2
–if you do not see bubbles you did it right — you do see bubbles, remove the patch with pliers and try again

Step 6- putting it back together
— put the little valve thingy back in and tighten it down with the little valve remover tool
— reinflate your tire to the previous psi (mine are at 30 for city driving)
–put the tire back on replacing the lugnuts in a star pattern
–let the truck down
 I also learned a little trick: If you have to change a tire on the trail and somehow manage to lose your lugnuts….just take one off of each of your other 3 tires and your spare. That way each tire will still have 4!!!! Sure beats waiting for someone to come looking for you!
08/11/10 14:53