 with Donald Roberts
Military Front Bumper conversion for a Samurai Photos by Donald
 Weak wimpy and anemic is what best describes the stock Samurai bumper, I needed a replacement! Adding larger then stock tires forces you to remove the stock bumper anyway otherwise you run into clearance issues. Adding 31″ or larger tires means you will also be cutting off the front fender attachment ‘horns’ that extend out from the frame so that you do not shred tire rubber. I looked at many of the fine quality and well designed bumpers offered by iZook.com’s advertising vendors listed in Bold but did not see anything that tickled my fancy. I wanted something simple and clean, able to attach a tow bar to, yet be replaceable on the cheap. I found such a critter in the world of military surplus jeep parts. A M151 ‘Mutt’ front bumper seemed to be just the ticket. There were two flavors to choose from, the standard front bumper, and the USMC version. I selected the USMC version because it had some nice tow & lift shackles already installed on the ends which I figured would come in handy if I was stuck someday, and since cheap was the keyword here, therefore one less item to buy. Ain’t I feeling smug and smart! More on this attitude later…
  Flat towing twenty five hundred plus pounds of samurai all day long can make for some nervous moments from time to time whenever a semi truck passes you. No need to add more worry wondering if your tow bar attached to the front bumper is going to stay put. I decided a stout piece of thick angle iron solidly welded to the frame was in order. You will need to remove the steering box in order to get enough room for a good solid and safe weld. This is especially important if you will be flat towing or just using the bumper as a tow point. (you just know you will be sometime, someday) I decided to go ahead and combine the bumper modification with the addition of a power steering conversion. Start by trimming the angle iron length such that later you can weld a hot bead on the top of the frame and also along the bottom of the angle iron at the frame intersection. Left photo show the angle iron ready to weld, and the rectangle stock already welded. Don’t weld it to the frame just yet.
 Clamp your angle iron to the frame in the position you find best. Put the steering box in position and observe that the angle iron needs to be notched to clear the steering box. Manual steering box needs only a slight notching to work (Left photo) However the power steering box needs quite a bit more clearance and you will need to get a little creative. (see right photo) Don’t remove any more material then you have to. You’re trying to provide as much weldable linear length as possible. Next, you will need to get some rectangle stock that fits the military bumper, I lucked out and was able to obtain a short section of the actual Mutt frame rails to use. Its not critical here, anything that fits snug is good. You need some thick wall material for this.
  Insert the rectangle stock into the military bumper, hold, then clamp, the bumper/rectangle stock assembly up to the angle iron which should previously also be clamped into place as if to be welded. When everything looks good and level and you can not see any future clearance issues, then tack the rectangle stock to the angle iron. Remove the bumper from the rectangle stock and remove the angle iron from the frame. Now you can weld up the assembly properly with no fears the underside welds may be marginal. After it cools, reinsert the military bumper and re-clamp the angle iron/rectangle stock assembly to the frame. If everything looks good and the steering box is still attached to the frame, then tack weld the new assembly to the frame. Remove steering box and weld that puppy up! Remember to weld a good hot bead on the top and bottom surfaces of the angle iron. I used my 230 amp AC stick welder for a good hot penetration with 3/16 #6011 rod. When cooled, paint and reinstall steering box. Install military front bumper and drill 4 holes all the way through rectangle stock. I like to use lock nuts for this type of application. Grade 5 hardware is also fine, just use a fine thread for maximum holding power.
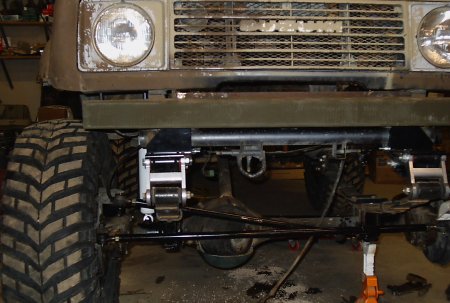
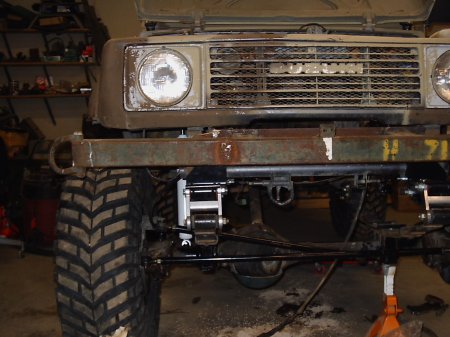 When your all done the standard bumper looks like the left photo and the USMC bumper looks like the right photo. If you would like the addition of a military flavor brush guard, (lower left photo) you can cut down one that is used on the CUCV series of vehicles. Search eBay for M1008 or M1009, or east cost folks can check www.colemans.com. They are too large and heavy to be shipped UPS so find them where
 you can.
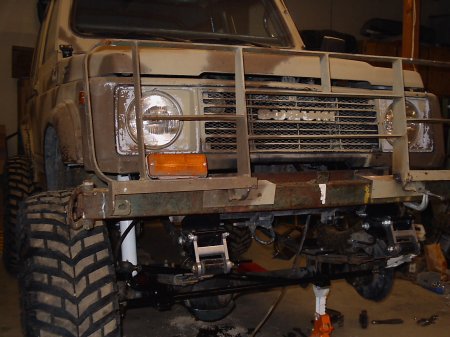 The M151 standard Mutt bumper also feature tow shackles, they attach in the middle of the bumper using the 4 frame bolts. See above first top left photo of this article. So meanwhile back at the ranch, I was feeling so darn smart and smug on saving a few buck by using the USMC bumper with the built in tow loops. Problem was while in Moab I got myself hung up on the rocks. Read the full story here. I thought I would be ok with the longer length of the USMC unit and found it
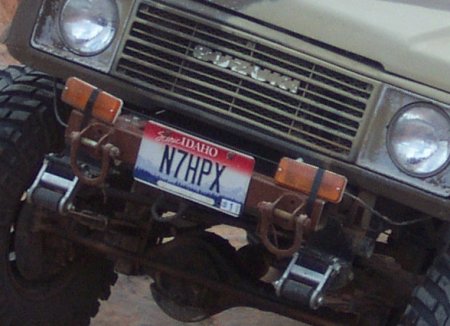 handy to bolt my hi-lift jack to it. Clearly I was wrong. Notice the currently severely shortened ends with the turn signals tapped on? (right photo) That’s called a field expedient by the military, everyone else calls it stupid. I call it embarrassing. So color me red-faced. Life goes on… END.
08/11/10 15:05:39