 with Jim Mazzola
Jim, What Have You Done?
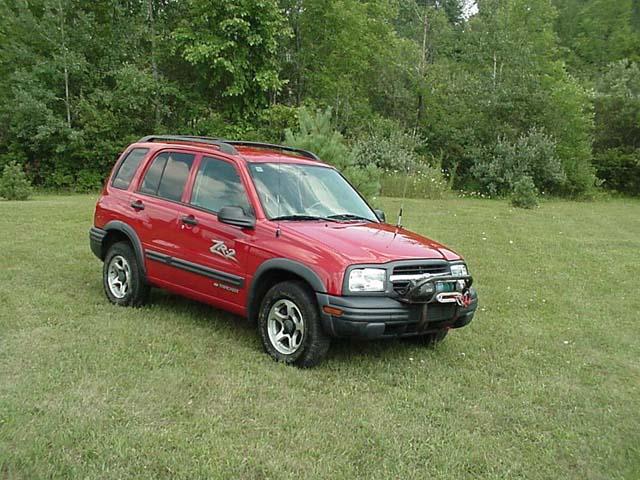 The glassy eyed look and lower jaw almost hitting the floor are the initial reactions which are usually followed by, youre kidding, right? But I guess thats to be expected when I tell everyone I was cannibalizing a perfectly good 2004 4 dr ZR2 Tracker, (with leather seats and A/C of course!) I guess its only perfectly good if youre content to watch from the sidelines when all the built vehicles are clawing their way up the boulder strewn trails. I was not! This long anticipated 4 door project was to replace the 9 lifted Black Tracker that I sold to good friends of ours Mitch and Rae Champoux a few years back.
 The project goals were to build a competent 4 door vehicle that could be used for exploring the Canadian bush for days at a time as well as being at home wheeling from the hills of Tennessee and Kentucky to the mountains of Colorado. What I wasnt trying to build was a rockcrawling go anywhere tube buggy (that comes next). I was willing to sacrifice some capabilities for a few creature comforts.
 Coming off the build up project of my sons 2 door Tracker I had plenty of ideas to work from. I was also trying to learn from some of the things we didnt like about his. The basics of my truck would be a 2.5L V6 and automatic trans. Based on the success of Bryces Geo-Crawler which was featured in CRAWL Magazine in March 2006, I would follow his lead on transfer case set up also and go with OTT Kicker 2. Relatively high costs associated with the low range gear set available for the Tracker and the lack of slip joint options for the standard Tracker t-case made this decision simple. No one was at all that interested in pursuing a flanged mount, (i.e. slip yoke eliminator) for the current Tracker t-case and I wasnt in any mood to invent that part at this time. I do however think that there is a need for this entity in the future for the Tracker/Zook world.
 The basic OTT t-case modification cuts off the front chain drive portion of the stock case and turns it into a two speed box. Behind that mounts a top shift t-case from a mid 80s Toyota truck. With the Tracker box serving as
 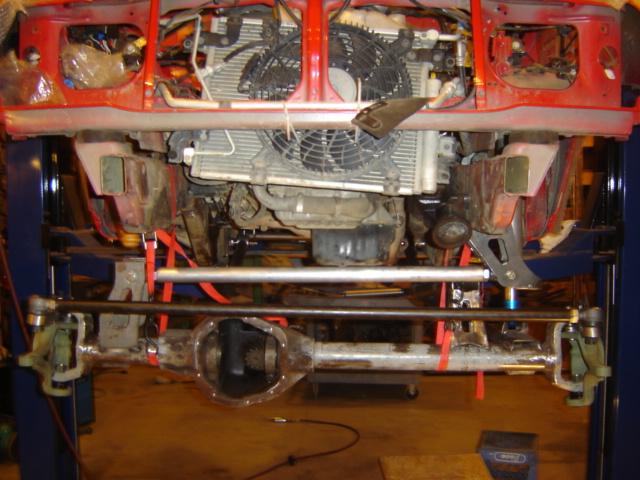 a two speed box @ a 1.82:1 and the Toyotas 2.28:1 reduction, the pair would yield a combination of 3 different ranges to choose from. (1.82, 2.28, and 4.15). Couple that with 5.89:1 R&P with the V6 auto @ 155 HP, it should have plenty of grunt and crawl.
One of the overall intentions of the design was to keep the truck height as low as practical without cutting into the top of the fenders or the passenger compartment side of the wheel wells. A belly height around 22 was also one of the established targets. Setting up the 37 x 14 IROCS on 17 Walker beadlocks established the wheelbase @ 106. This would keep them clear of the fender wells while still providing future considerations of a slightly larger tire. My real desire is a 38 tire but there is a giant hole in tire availability for 38. Time will fix this Im sure but until then Ill run the IROCS.
 Both axles would be Dana 44s with upgraded shafts at both ends. Dutchman and Superior at the rear, (long story, dont ask!) and Yukons with Super joints up front. Detroits at both ends. I decided to go this way for the road manners that a Detroit would provide over a spool.
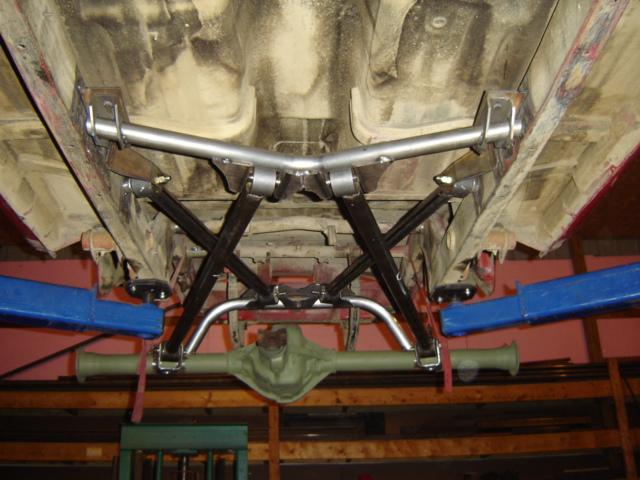
 Rear suspension would be 4 link X style with a sway bar and fronts would be a 2 link radius arm with track bar. Fox 2.5 air shocks were also selected due the weight of the vehicle being a tad more than the 2 dr of Bryces which had 2 shocks.
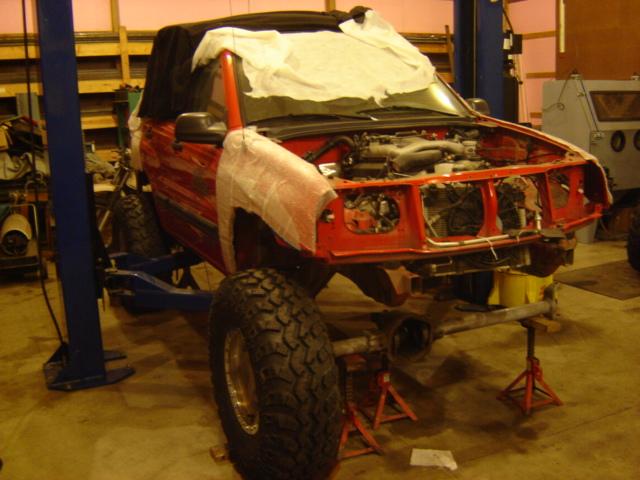
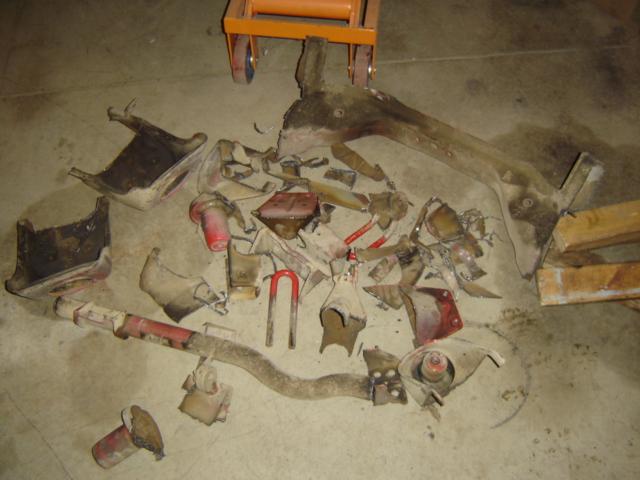 First task was to close my eyes, fire the plasma up and start cutting every bracket, brace, hanger, support, crossmember, weld stud, heat shield, and suspension mount that existed on the frame. I was left with two rails connected at the rear by the rear frame crossmember and gas tank mount and the engine mounts holding the engine to the frame up front. The result is about a 180 lb pile of rubble of plastic and steel. Something the truck really didnt need!
 Next on the agenda was to get the axle housings set to the correct width. The rear axle is from a 197? J4000 Jeep which was almost a perfect fit except it was slightly offset to the passenger side. With the 3 Walker rim offset I would be less than 82 to outside of tire. I could live with this as it was. In the rear was to be a 4 link X style suspension. I used Spherical joints at one end and rubber OEM Cherokee joints at the other to dampen the harshness of a polyurethane style joint.
The rear suspension was uneventful compared to the front. The only oddity to date is the jounce bumper mounts require a brace to the center of the vehicle. This is due to the length of the support structure.
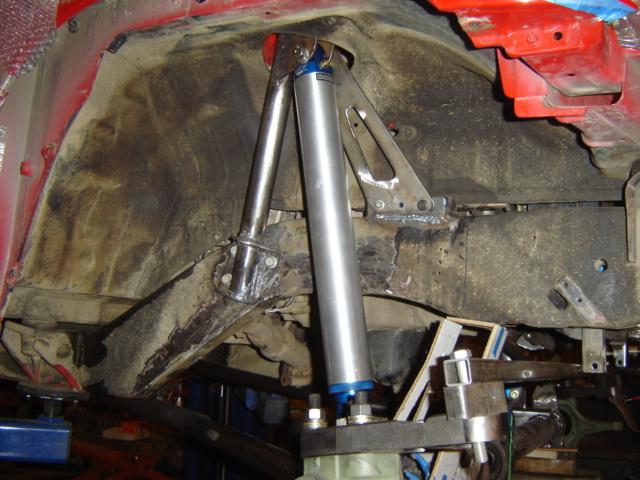
 The 12 air shock was mounted a near vertical as I could, stuffing it up in the rear corner. The downside to this position is that I will need to re-route the gas tank filler hose on the passenger side.
I plan on tying the top of the axle upper mount tube to the rear differential cover ring and adding a few gussets once I finish weld the whole axle.
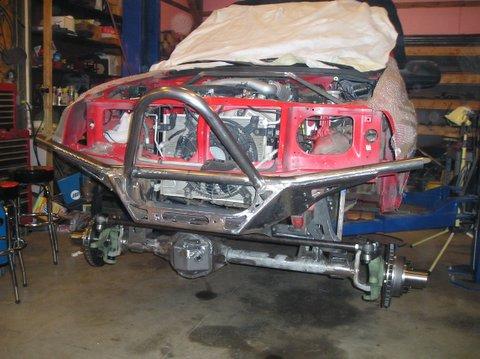
The front was a Chevy ton. It was too wide and would have to be narrowed. I found that OEM Bronco II axle shafts were a perfect fit if I narrowed the axle by 2 inches. I proceeded to cut off BOTH knuckles and 2 inches off the drivers side. This is because I would also need to get the correct caster established for the front. After getting the housing narrowed, it was on to the suspension and linkage.
The front would be a simple radius arm with a third link to control rotation and a track bar to keep it lined up.
 From my experience with building the 2Dr, the front was going to be the most difficult. Even with 4 wider frame rails, trying to fit the steering box in with a V6 engine, while not giving up A/C was going to be the biggest challenge. I used a Chevy M van gear box which is an inside rail, forward facing setup. After getting the front axle located with all the required links, i.e. tie rod, track bar, it was time to try and fit the steering box. It took three attempts to get the box in a position that cleared the A/C compressor, the tie rod and axle bracket at full left/right steering positions, ALL at full compressed suspension. The final result is clearance worst condition from gearbox to pump. Which I could improve on by simply adding a spacer under the motor mount.
A fatal flaw I see in most suspension designs is that they are typically built at ride height. The fully compressed positions are usually neglected until its driven on an RTI ramp and you find out that the axle bracket hits the frame rail or the steering binds up. This is reason I designed the suspension at full compression.
 Another oddity is that instead of the typical drop pitman arms that are so prevalent, I had to bend my pitman arm UP. This again is because of my desire to keep the truck as low a possible and stuff the components under the existing bodywork.
 The top of the 12 air shock mount actually protrudes up through the original opening of the strut in the inner fender well. The shock tower brace is 1X 2 rectangular box. It barely clears the hood so Ive yet to decide to redo it as a 1 round tube.
Throughout the design youll notice that I bolt on bracket and mounts. While this adds a bit of weight to the overall design, it enables me to remove parts to make adjustments without having to break out the Plasma cutter and surgically remove welded on components.
One additional objective was to combine as many features as possible into single brackets. One of them that worked quite well was the track bar mount and the jounce bumpers. The jounce bumpers are from mid 90s Chevy pickups and work very well as we have used them on the 2 dr and a few rock buggys. The bonus is at around $15.00 their CHEAP too!
 Once the suspension was completed from a mock up standpoint I was able to get started on the modifications to the bodywork and the bumpers. Up front the bumper would be designed to fit a Warn 8000. To keep approach angles as favorable as I could, I stuffed the winch within 1 inch of the A/C condenser core fan and 1 under the lower grill crossmember. This would allow me to keep the front grill intact. The winged design bumper was one that we found to be very successful on the 2 door. With the tires as far forward as they are, at full compression left and right turns, the tire gets up into the front headlight region. Bobbing the front corner of the fender and angling the front bumper up, allowed me bring the bumper all the way out to the corner of the fender sheet metal and tie into the fender bars that will outline the fender openings. I also Swiss cheesed the front bumper to reduce some of the mass in my continued attempt to keep me under the dreaded 4000 lb piggy category.

 The rear was much more extensive in the way of body work modifications. Bobbing the rear was a bit more work but would allow me to incorporate the same winged design as the front. Carrying the trim line along the natural line of the rear fender and just below the rear tail light made the bobbing a bit easier. The fender bars will cover the straight line trim and allow me to slant the fender bars and miss the gas filler door. The actual design of the rear bumper is still pretty much in my head but will entail a second horizontal bar above the winged bar and provide a flat topped area below the rear door.
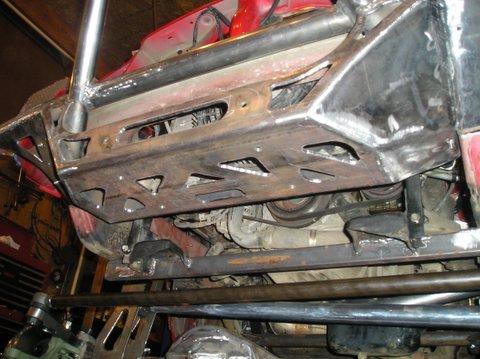 Still on the to do list for next issue is: Finish the rear bumper, brakes, plumbing, Belly skid, Rock rails, fender bars, driveshafts and last but not least, transmission / t-case mount and shifter. Heres my dig @ OTT, Im patiently waiting for my case which they have had since January. I know Ben and the guys @ OTT are working hard but if they expect to win over the Tracker/Zook community theyll have to do a bit better on delivery of their products or be faced with an upstart competitor that can deliver in a reasonable length time.
The goal right now is to be complete and have the project vehicle @ ZookiMelt 2006. Stay tuned for part 2.
Jim-kb8ymf
08/11/10 15:25:13