 with Tim Justice
Ford 8″ Rear End Swap Into Suzuki Samurai
 The weakest link in the Suzuki Samurai?s drivetrain is arguably its rear axle assembly. While much attention is given to the front end, new products have been developed that re-enforce the existing parts. Under most circumstances, this will provide enough beef to handle up to 32″ tires when used with a measure of finesse. I needed to change gearing because I had moved to larger tires, so the expense of purchasing new ring & pinion gears had to be made no matter what I did. I found a good buy on a Sidekick Front 4.62 chunk, and used my locker that I already had in the rear of the Samurai. This I installed in my Samurai front end along with new bearings, seals, and a pair of the new Birfield Rings. I won?t go into what?s involved in this swap, as it has been well documented.
 The rear, however, is plagued with small axles and a poor bearing/seal design which can only be improved in two ways, ordering expensive custom axle shafts to replace the Suzuki units, or replacing the entire assembly (plus new gears). There are a number of options for rear axle swaps, none of which are inexpensive or ?bolt-in?. I had experience with the Ford design, but thought the 9″ to be over-kill & much too heavy for what I needed. I decided to go with the 8″. “What?s an eight inch rear end?” everyone asked. They were used in Ford passenger cars from the early 60?s through the late 70?s. It looks just like the 9″, but somewhat smaller- more like the Toyota pickup. They came in everything from Mustangs & Mavericks to the heavy-hitter Torinos and LTD’s, and have the same axle diameter as the HD 9″ where the axle goes into the side gears. Several lockers are available for them (some are literally the same part number as the 9″) as well as a smaller selection of R & P gears– including 4.62. A substantial benefit to going with an 8″ rear is that they are easily half the cost to purchase vs. a truck rear end.
My idea was to replace the weaker stock axles and ring-and-pinion gears with something stronger. The Ford passenger car lug pattern is smaller than the Samurai pattern, and I originally planned to re-drill the axles to 5 x 5.5″. But upon removing the drums, I found there wasn?t enough material to drill into! So I studied the Suzuki axle design, and saw that it basically uses the drum to adapt a small 4-lug pattern to the wheel pattern. I decided to modify the Ford axle so that it could be used with the Samurai drum brakes. While this is no improvement in the braking department, it will suffice until I can design a disc brake system, or purchase one that bolts onto the stock Suzuki housing. The axle had to be machined in a number of places to fit the Sam drum, but it wasn?t very difficult. I found that the Samurai backing plate needed to be moved out ~1/2 ” to 5/8″ to align the shoes with the drum. I chose to make a plate, which acts as a bearing retainer, pattern adapter, and spacer all in one.
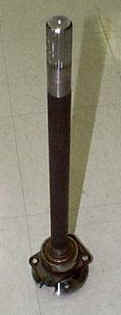 Once I was convinced the brake situation was going to work, I took careful measurements to determine how much my rear end would have to be altered to fit the Samurai width. My axle assembly came out of a 1970 Torino. I took 8″ out of the passenger side so that the chunk would be offset like the original Suzuki. At this time, I sent the passenger side axle off to Moser Engineering for them to shorten and re-spline the axle. They told me that I was fortunate in the fact that my 8″ axles did not taper to the point that the shaft diameter was too small to be able to shorten– I attributed this to the fact that my axle came out of a bigger car. I decided
 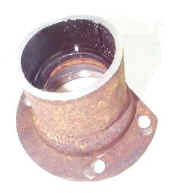 I would narrow the housing myself. Using a saw, I cut off the bearing flange ~2.5″ from the end– this must be machined down & removed from the axle tube so it can be re-used. I needed a Large-tubing cutter to make a clean cut on the end of the housing tube, but couldn?t find one to borrow. You can rent one, but I found you can buy one from a mail-order catalog cheaper than the rental on one! I was amazed at how thick the axle tube material was (almost twice as thick as the Samurai?s was) but the cutter worked fine. I pressed the flange end into the axle tube & tack-welded it in place. Next, I mounted all the stock Samurai brackets for the emergency brakes onto the Ford housing, as well as adding a drain plug, since the 8″ didn?t have one.
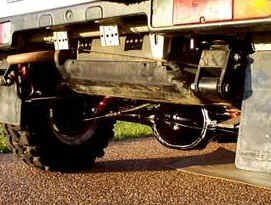
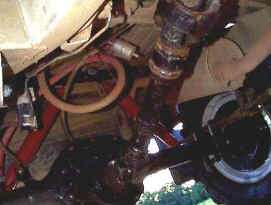 After having the new 4.62 ring & pinion set up with an E Z Locker, I assembled everything along with my new adapters. Everything went together fine, and looks like a Super Duty Samurai factory axle. I had to alter the original emergency brake cable, but it was not difficult. The only other obstacle I had to overcome was a driveshaft. From other articles, I saw that a Toyota front shaft would be the ticket, with the CV joint & beefy u-joints. An added plus I found, was that the Toy rear u-joint fit perfectly into the Ford yoke = not having to pay to have another yoke put on the Toyota driveshaft. I cut the shaft down, and it works very Well.
Trial By Fire
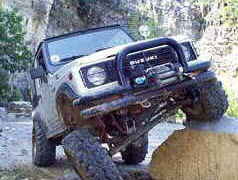
As it always seems to go for me, I wound up cutting it close finishing up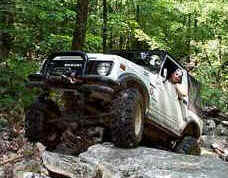 my Samurai in time to make the run at Monteagle, TN., which has some of the most challenging trails in the area next to Tellico. I pulled my rig out of the shop and drove it into a deep ditch to twist up the suspension to make sure nothing would bind, drove it onto the trailer, and headed out to Monteagle. There, I met up with Drew Huber, Mike Dugan, and several other fellow Zukers and headed straight to the trails. My engineering was a success! I ?wheeled hard Saturday and Sunday without incident, except for a bad radiator hose. There is a write-up in the Trails Section called “The Eagle” which further describes the weekend?s excitement.
Comments
 Would I do this swap again? Well, if I had to do it all over, I believe you could save some time by using 9″ truck axles (the small bearing ones) along with their drums so you would not have to create the adapter plates. It was no big deal for me, as I had access to the equipment needed to build them. You would need to buy the truck axles separately and have both of them cut down instead of one, so perhaps it would be a wash. Regardless, the 8″ is far-and-away stronger than the factory axle assembly, and has held up to everything I have thrown at it so far. Now I ?wheel with no nagging worry of snapping a rear axle!
08/11/10 15:13