 with Drew Huber
Beef Your Birfields
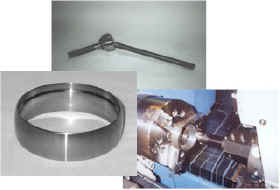 I have always heard that the weak link on the Samurai front axle was the birfield joint. After pricing custom axles for the Zuk, I decided to keep the stock axle and beef them up. I had always wanted to run 33″ tires but was concerned that the axles couldn?t handle it, so I chose to install a set of Birfield Rings made by Spidertrax. Since we were going to have the axles out we also went ahead and replaced the seals and bearings with a front axle rebuild kit from Petroworks.
Since I was lacking a shop press and a good die grinder, not to mention I?m not to experienced in rebuilding a front axle, I chose to have Mike Dugan of Zuki South do the install. Mike always makes me help in these type jobs so that I can gain experience working on my rig. Here?s what you?ll need to complete the job: die grinder, hydraulic press, Suzuki service manual or someone like Mike that knows what he?s doing. I would also recommend printing a copy of Spidertrax online installation page from their website. The steps below are taken from their site and explain the install reusing the old bearings and seals. Their website goes into more detail and also has some very good drawings of certain steps.
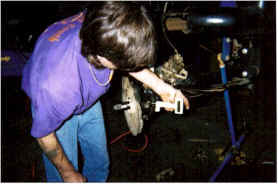
First thing that needs to be done is a complete tear down of the front axle. Start by raising and supporting the front axle on stands, and remove the wheels. This is a good time to drain the front differential since it has to be done. Remove the disc brake calipers along with carrier. You can then remove the tie rod ends from both steering 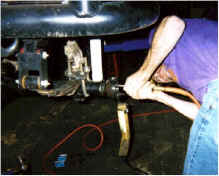 knuckles. Make sure you mark the hub cover to hub body to ensure proper re-assembly and then remove the hub cover. Inside the hub is a circle clip on the end of the axle shaft that needs to be removed. Remove all the oil seal cover securing bolts from back of steering knuckle. Now you can remove the steel retainer, felt pad, and oil seal. Now for the tricky part, you must remove the top and bottom kingpins. Be sure to mark them top and bottom and do not switch the kingpins around. Now you?re ready to pull off the steering knuckle along with the spindle, hub, and rotor. The axle shaft should remain in axle housing for now. Place the kingpin bearings aside but be sure to mark the original locations for the bearings just like you did for the kingpins, do not switch these around either. Now you can remove both axle shafts from the housing. You will need to clean the following areas for the rest of the installation: the front axle birfield joints (the outer surface where the press fit is taking place) and the part of the axle housing where the birfield joint resides (this is where you will need to do some grinding).
Before you press on the rings check to make sure the inside of the birfield rings and the outside of the birfield joints are completely clean and free of any debris. It is a lot easier to press the rings on if you lubricate the mating surfaces with grease. Take notice of the direction in which the birfield ring is to be pressed onto the birfield joint, the step inside the ring is to fit over the ridge on the birfield joint. You will need to use a hydraulic press to get the rings on the birfield. You do not want to hammer the rings in place as the rings carry a precision force fit, which will directly effect their performance. Press the rings on until they bottom out on the birfield joint. The back surfaces will be flush when complete.
Make sure you stuff a rag into front axle to prevent grinding dust from entering the axle tubes. You will need to use a die grinder to provide clearance for the birfield ring. You must grind about 1/16 of an inch from four places inside the inner knuckle. It doesn?t take much grinding in the four areas to allow proper fit of the new birfields; Spidertrax has a great drawing on their website of the places that must be modified. You will need to check for proper clearance before you do the final reassemble. If everything checks out, you?re ready to put the axles back together.
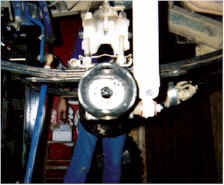
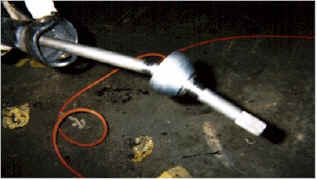
Clean up all grinding dust or other debris from the front axle and pack the housing ends with fresh axle grease. Then pack the back of the birfield joint with fresh axle grease and slide the axle shaft into housing. Pack the kingpin bearings with fresh grease and put the top bearing in first. Do not put in the lower bearing yet. Make sure the felt pad and knuckle seal are both in place over the housing and slide the complete knuckle assembly with the hub, spindle, and rotor onto the axle shaft and housing. Pitch the knuckle upward to allow the lower kingpin bearing to be installed into its race and install the kingpins and secure the kingpin bolts. Next you secure the knuckle seal, felt pad, and steel retainer plate with the 8 bolts you removed. Then you install the circle clip onto the axle inside the hub. Now install the hub cover and make sure the cover is aligned correctly. Now you can install the tie rods and mount the brake calipers. Last on the list you?re ready to mount the wheels, lower the vehicle and go wheeling!
 I will say that this is not a one or two hour job. It took us about 7 hours to do both sides. Also make sure you follow the directions carefully and take your time. When it comes to your front axle, it?s got to be right since it can effect steering. The birfield rings look to be very well made and they pressed on very easily. Everything bolted up nice and tight and unless you know they have been installed, you cannot notice any difference in the handling or turning radius of the truck. I have also talked to Eddie from Spidertrax and he told me that there are over a 100 sets already installed around the country and no report of a birfield failure yet.
I can now go off-road with more confidence than ever before knowing that my birfields are protected. I ran hard in Moab with the new rings and didn?t have a single problem. Since returning from Moab I have also upgraded my wheel and tire combo from the 32″ Swamper SX?s to a set of 33 X 12.50 Swamper Radial SSRs mounted on Willamette 15 X 8 beadlocks with 2″ backspacing. I feel confident of this combo now that my birfield rings are in and will update this page once I have had time to really trail test this new setup.
Team Zuki
For more info contact:
Spidertrax Offroadwww.spidertrax.comvoice – 1-800-286-0898 email – sales@spidertrax.com
08/11/10 15:16